Re-building Tetris using simple Javascript and JQuery was one of the things I did to prepare for Hack Reactor’s technical interview. This project exposed me to some data manipulation algorithms, which ended up to be tremendously helpful for the interview. This tutorial assumes that you have already been introduced to JQuery. Let’s get started!
1. Building the DOM
Check out this part on GitHub
We will start with building the Playfield, which is simply a table that is 10 cells wide and 22 cells tall. We will want each row and cell to have a number id so that we can reference to them easily using JQuery. For example:
<tr class='0'>
  <td id='0'></td>
  <td id='1'></td>
  <td id='2'></td>
  <td id='3'></td>
</tr>
If we want to select cell #1 using JQuery, we can simply select it using JQuery selector $(‘.0’).find(‘#1’). Since we want a 10X22 grid, we will need 22 rows, and within each row, 10 cells. Instead of manually typing out all 220 lines of html, we can use JQuery’s append method to help build our table. We first need to create an index.html file with the following code:
<!DOCTYPE html>
<html>
  <head>
    <title>Tetris.js</title>
    <link rel="stylesheet" type="text/css" href="./style.css">
    <script src="http://ajax.googleapis.com/ajax/libs/jquery/1.11.1/jquery.min.js"></script>
    <script src='./tetris.js'></script>
  </head>
  <body>
    <table id='playfield'></table>
  </body>
</html>
In the same folder, go ahead and create a file called tetris.js and style.css. Our javascripts and css will go there, respectively.
Now in our tetris.js file, do the following:
//Declare global object tetris
var tetris = {};
//Draw the grid
tetris.drawPlayField = function(){
  for(var row=0;row<22;row++){
    $('#playfield').append('');
    for (var col=0;col<10;col++){
      $('.'+row).append('');
    }
 }
}
The drawPlayField method contains two for loops. The first loops from 0 to 21, and insert a with the row number as class at the end of tag. The second loop lives within the first loop, and it goes from 0 to 9, inserting a tag. This method effectively creates the 10>22 grid, with each rows and columns uniquely numbered.
Let’s called our drawPlayfield after getting our document ready. Insert the following code after the drawPlayField method.
$(document).ready(function(){
  tetris.drawPlayField();
})
Now, add the following to our style.css:
td {
  width: 25px;
  height: 25px;
  border: 1px solid black;
}
This gives our cell a 1px solid black border, as well as a fixed height and width of 25px.
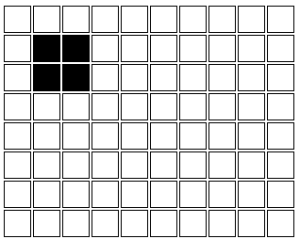
Saves everything and open index.html with your browser. You should see the following:
2. Draw on the Grid
Check out this part on GitHub
We first need a method to draw something on the grid. Basically, we want a method that:
- Take an array of coordinates as parameters.
- Loops thru the array.
- Fill each cell matching the coordinates black.
We need to decide how we want to format our array of coordinates. I always like to name my variables in context for ease of reading, so I am going to use an object like this to store my coordinates:
{row: 1,col: 1}
An array of coordinates will look like this:
[{row: 1,col: 1},{row:2,col:1},{row:3,col,1}]
So with this in mind, let’s build our method:
//Fill the cells
tetris.fillCells = function(coordinates){
  for(var i=0;irow = coordinates[i].row;
    var col = coordinates[i].col;
    var $coor = $('.'+row).find('#'+col);
    $coor.attr('bgcolor','black');
  }
}
The fillcells method takes in an array of coordinates and loop through each on of it. During each iteration, it will store the row number in local variable row, col number in local variable col, and the JQuery selector in local variable $coor. It will then change the bgcolor of whatever the $coor referenced to be ‘black’.
To test if this works, let’s declare a variable to store our current coordinates. For now we will use the following coordinates, which is basically a 2X2 square.
//Variable to store current coordiates
tetris.currentCoor = [{row:1,col:1},
                      {row:1,col:2},
                      {row:2,col:1},
                      {row:2,col:2}];
Then let’s add this in our document.ready function.
tetris.fillCells(tetris.currentCoor,'black');
You should see the following once you save and refresh your page.

Let’s say instead of filling it black, I want it to able to choose the color I want when calling tetris.fillCells. I can then change my tetris.fillCells to the following:
//Fill the cells
tetris.fillCells = function(coordinates, fillColor){
  for(var i=0;irow = coordinates[i].row;
    var col = coordinates[i].col;
    var $coor = $('.'+row).find('#'+col);
    $coor.attr('bgcolor',fillColor);
  }
}
With this edit, let’s say if I want to fill a cell to be blue instead of black, I can simply call tetris.fillCells(tetris.currentCoor,’blue’).
3. Move the Shape Left and Right
Check out this part on GitHub
Now that we can draw shapes on our Playfield, let’s build a method to move the shape left and right. This is actually not that difficult if we break down the method into the following steps.
- Erase current shape.
- Move the column of current coordinates to +/- 1.
- Re-draw the shape with new coordinates.
Let’s start building.
tetris.move = function(direction){
  this.fillCells(this.currentCoor,'');
}
The move method takes in ‘left’ or ‘right’ as a parameter and move the shape accordingly. The keyword this is referring to the object in which the method was called, which is tetris in this case. So far, our method will call the fillCells method on currentCoor, and change its bgcolor to nothing.
Save and refresh your page. Now assuming you are using Chrome, hit Ctrl+Shift+J to call up the console, and the enter:
tetris.move()
You should see that your shape is now disappear. Now let’s build the next step of our method, moving the coordinates.
tetris.move = function(direction){
  this.fillCells(this.currentCoor,'');
  for(var i=0;icurrentCoor.length;i++){
    if(direction === 'right'){
      this.currentCoor[i].col++;
    } else if (direction === 'left'){
      this.currentCoor[i].col--;
    }
  }
}
This will loop thru the currentCoor array, and for each iteration, depending on if the direction parameter is ‘left’ or ‘right’, it will add or subtract 1 from the col value of current coordinate, respectively.
Now to re-draw the shape:
//Move current shape
tetris.move = function(direction){
  this.fillCells(this.currentCoor,'');
  for(var i=0;icurrentCoor.length;i++){
    if(direction === 'right'){
      this.currentCoor[i].col++;
    } else if (direction === 'left'){
      this.currentCoor[i].col--;
    }
  }
  this.fillCells(this.currentCoor,'black');
}
Save and refresh again. Now in your console, try tetris.move(‘right’) and tetris.move(‘left’). You should see your shape move!
We want to be able to move our shape using the directional key on our keyboard. In JQuery, we can use the keydown method to capture the event when a key is pressed. In our document ready function, add the following:
$(document).keydown(function(e){
  console.log(e.keyCode);
}
This function will be triggered whenever a key is pressed down anywhere in your document. The parameter e basically represent the event of keydown. Each keydown event has a unique keyCode for each key on your keyboard. You can google the keyCode for ‘left’ and ‘right’. In this example, I am adding in a line to console.log the keyCode of the keydown event whenever a key is pressed. You can then simply go to your console and see that keyCode 39 and 37 is logged whenever ‘right’ and ‘left’ is pressed, respectively.
Now, add the following:
$(document).keydown(function(e){
  console.log(e.keyCode);
  if(e.keyCode === 39){
    tetris.move('right');
  } else if (e.keyCode === 37){
    tetris.move('left');
  }
 })
We are adding a simple if…else if statement to call tetris.move(‘right’) when keyCode is 39, or tetris.move(‘left’) when keyCode is 37. Save and reload your page, and then press left and right to test your code. You should be able to move your shape now!
You will find out that the shape can go off the Playfield. That’s because our tetris.move method is not checking to see if our shape hit the border. In order to achieve this, we need to:
- See if our new position is off the playfield.
- If so, call tetris.move in the opposite direction to cancel original move.
Let’s add this in our code:
//Move current shape
tetris.move = function(direction){
  var reverse = false;
  this.fillCells(this.currentCoor,'');

  for(var i=0;i<this.currentCoor.length;i++){
    if(direction === 'right'){
      this.currentCoor[i].col++;
      if(this.currentCoor[i].col>9){
        reverse = true;
      }
    } else if (direction === 'left'){
      this.currentCoor[i].col--;
      if(this.currentCoor[i].col<0){
        reverse = true;
      }
    }
  }
  this.fillCells(this.currentCoor,'black');

  if(reverse && direction === 'left'){
    this.move('right');
  } else if (reverse && direction === 'right'){
    this.move('left');
  }
}
First, we are declaring a new local variable called reverse, and set its original value to false. Then, we are adding two if statement within our loop, after we calculate our coordinate, and if the new coordinate is off the playfield (greater than 9 or less than 0), set reverse to true.
Finally, after our loop, we will add another if statement so that if 1) reverse is true, AND 2) direction equal ‘left‘, call tetris.move(‘right’), and vice versa. You can now save and reload your page, and see if your code works!

My piece wont move at all because it says my current coordinate is undefined.
LikeLike